
Steve Jobs was often quoted as saying “simple is hard.” The ipod offers an excellent illustration of
this notion: a small, portable device
with only 5 buttons (all controllable with your thumb) that lets you navigate
and access thousands of
songs and albums. In fact, I would assert that the
ipod’s simplicity was a key driving force behind its popularity. I would also bet that arriving at the final
design of the ipod was anything but simple…it likely took hundreds of crazy-smart software engineers and
thousands of man hours to arrive at the product that now provides so many of us with the
soundtracks for our lives.
 |
|
House in Yatsugatake /
Kidosaki Architects Studio
|
Contemporary architecture shares many virtues with the
ipod…it is typically uncluttered and “simple” in presentation. The considerations and planning necessary to achieve a
contemporary look, however, is most often highly complex and fraught with a multitude
of design considerations—the vast majority of which are never evident to the end
user. This notion has become
increasingly obvious as I have tried to design and build my own “contemporary
refuge” (aka “mancave”). Perhaps no element of my build has
illustrated this more than the mono-stringer staircase upon which I am
currently working.
Designing the railing for my stairs, for example, has proven exceedingly challenging to say the least. My design had to match the loft's railing but unlike the loft, fascia mounting each newel post with large brackets to the side of the staircase wasn't an option. Moreover, simply fabricating each post proved considerably more challenging than the process of fabricating the posts for the loft's railing.
To start, I first had to figure out how long each post needed to be. Code stipulates that a stairway's handrail must measure 36" from the leading edge of the tread. My design, however, called for each post to be centered on each tread (see below):

Thus, to comply with code, each post had to be longer than 36" because as you move the post back from the leading edge of the tread, the distance between the tread and top rail increases. I'll spare you the dissertation of how I determined this dimension, but let's just say I had to consult a few people smarter than myself to be sure I figured it out correctly.
With the height of each post determined, I then had to cut the top of each post at the same angle as the stairs to ensure the top rail would sit flush atop each post.

This was accomplished using Jim's articulating band saw:
 |
| Jim has all the best tools |
 |
| If holes are drilled through-and-through like the loft's posts, each cable's linear course becomes disrupted as it passes through each post...and that's not sexy. |
 |
| Offsetting holes |
Offsetting the holes thus allows each cable to pass through the intermediate posts without disruption:
 |
| Offset holes with straight cable runs...now that's sexy |
The last major design consideration was figuring out a method for attaching each newel posts to the staircase...a rather tricky proposition given the staircase's mono-stringer design.
 |
| Hmmm....where to attach the newel posts? No outside stringer to tie into. See what I mean...simple is complex. |
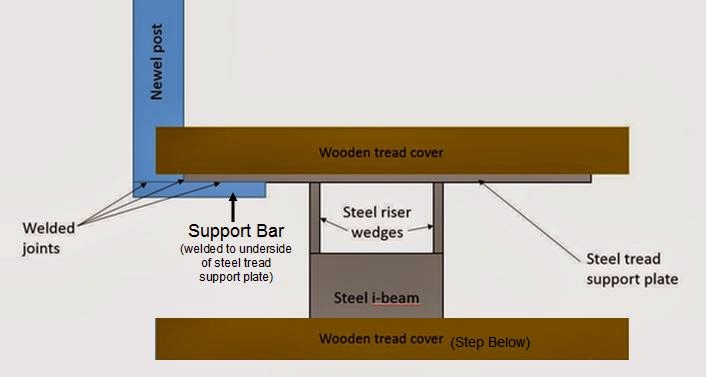
Obviously, using the same brackets I designed to affix each newel post around the loft's perimeter wasn't an option...there simply isn't anything to which the bracket could be bolted. I somehow needed to figure out a way to connect each newel post to the steel portion of the staircase to ensure the railing would be rigid enough to perform its function (all without cluttering up the design and overall aesthetic). To accomplish all these things, I needed a solution that was both "low profile" and robust/strong....after all, a big, clunky steel bar connecting my newel post to the staircase's spine would sort of defeat all the work I had done up to this point. With these considerations in mind, I settled on the following concept:
 |
| Here is a rough schematic as viewed from the side of the staircase |
 |
| This alternative view is what you would see if you were standing on the staircase itself and looking between the steps (Cut me some slack, I know this schematic is pretty screwy looking. I can't draw to save my life) |
As you can see from the schematic above, each newel post is recessed (aka "notched") partially into each tread...I felt this detail gave the railing a more custom, integrated appearance and would also provide some added stability to each newel post. Achieving the above concept was
a bit of a process. Before committing to this design, I did a "dry fit" mock up using a spare tread I had and a wooden clamp to hold things in place:
The next step will just be to do it for real!
 |
| Dry fit mock up (the white "S" is short for "support bar") |
 |
| View from underside (support bar is also mild steel) |
No comments:
Post a Comment